

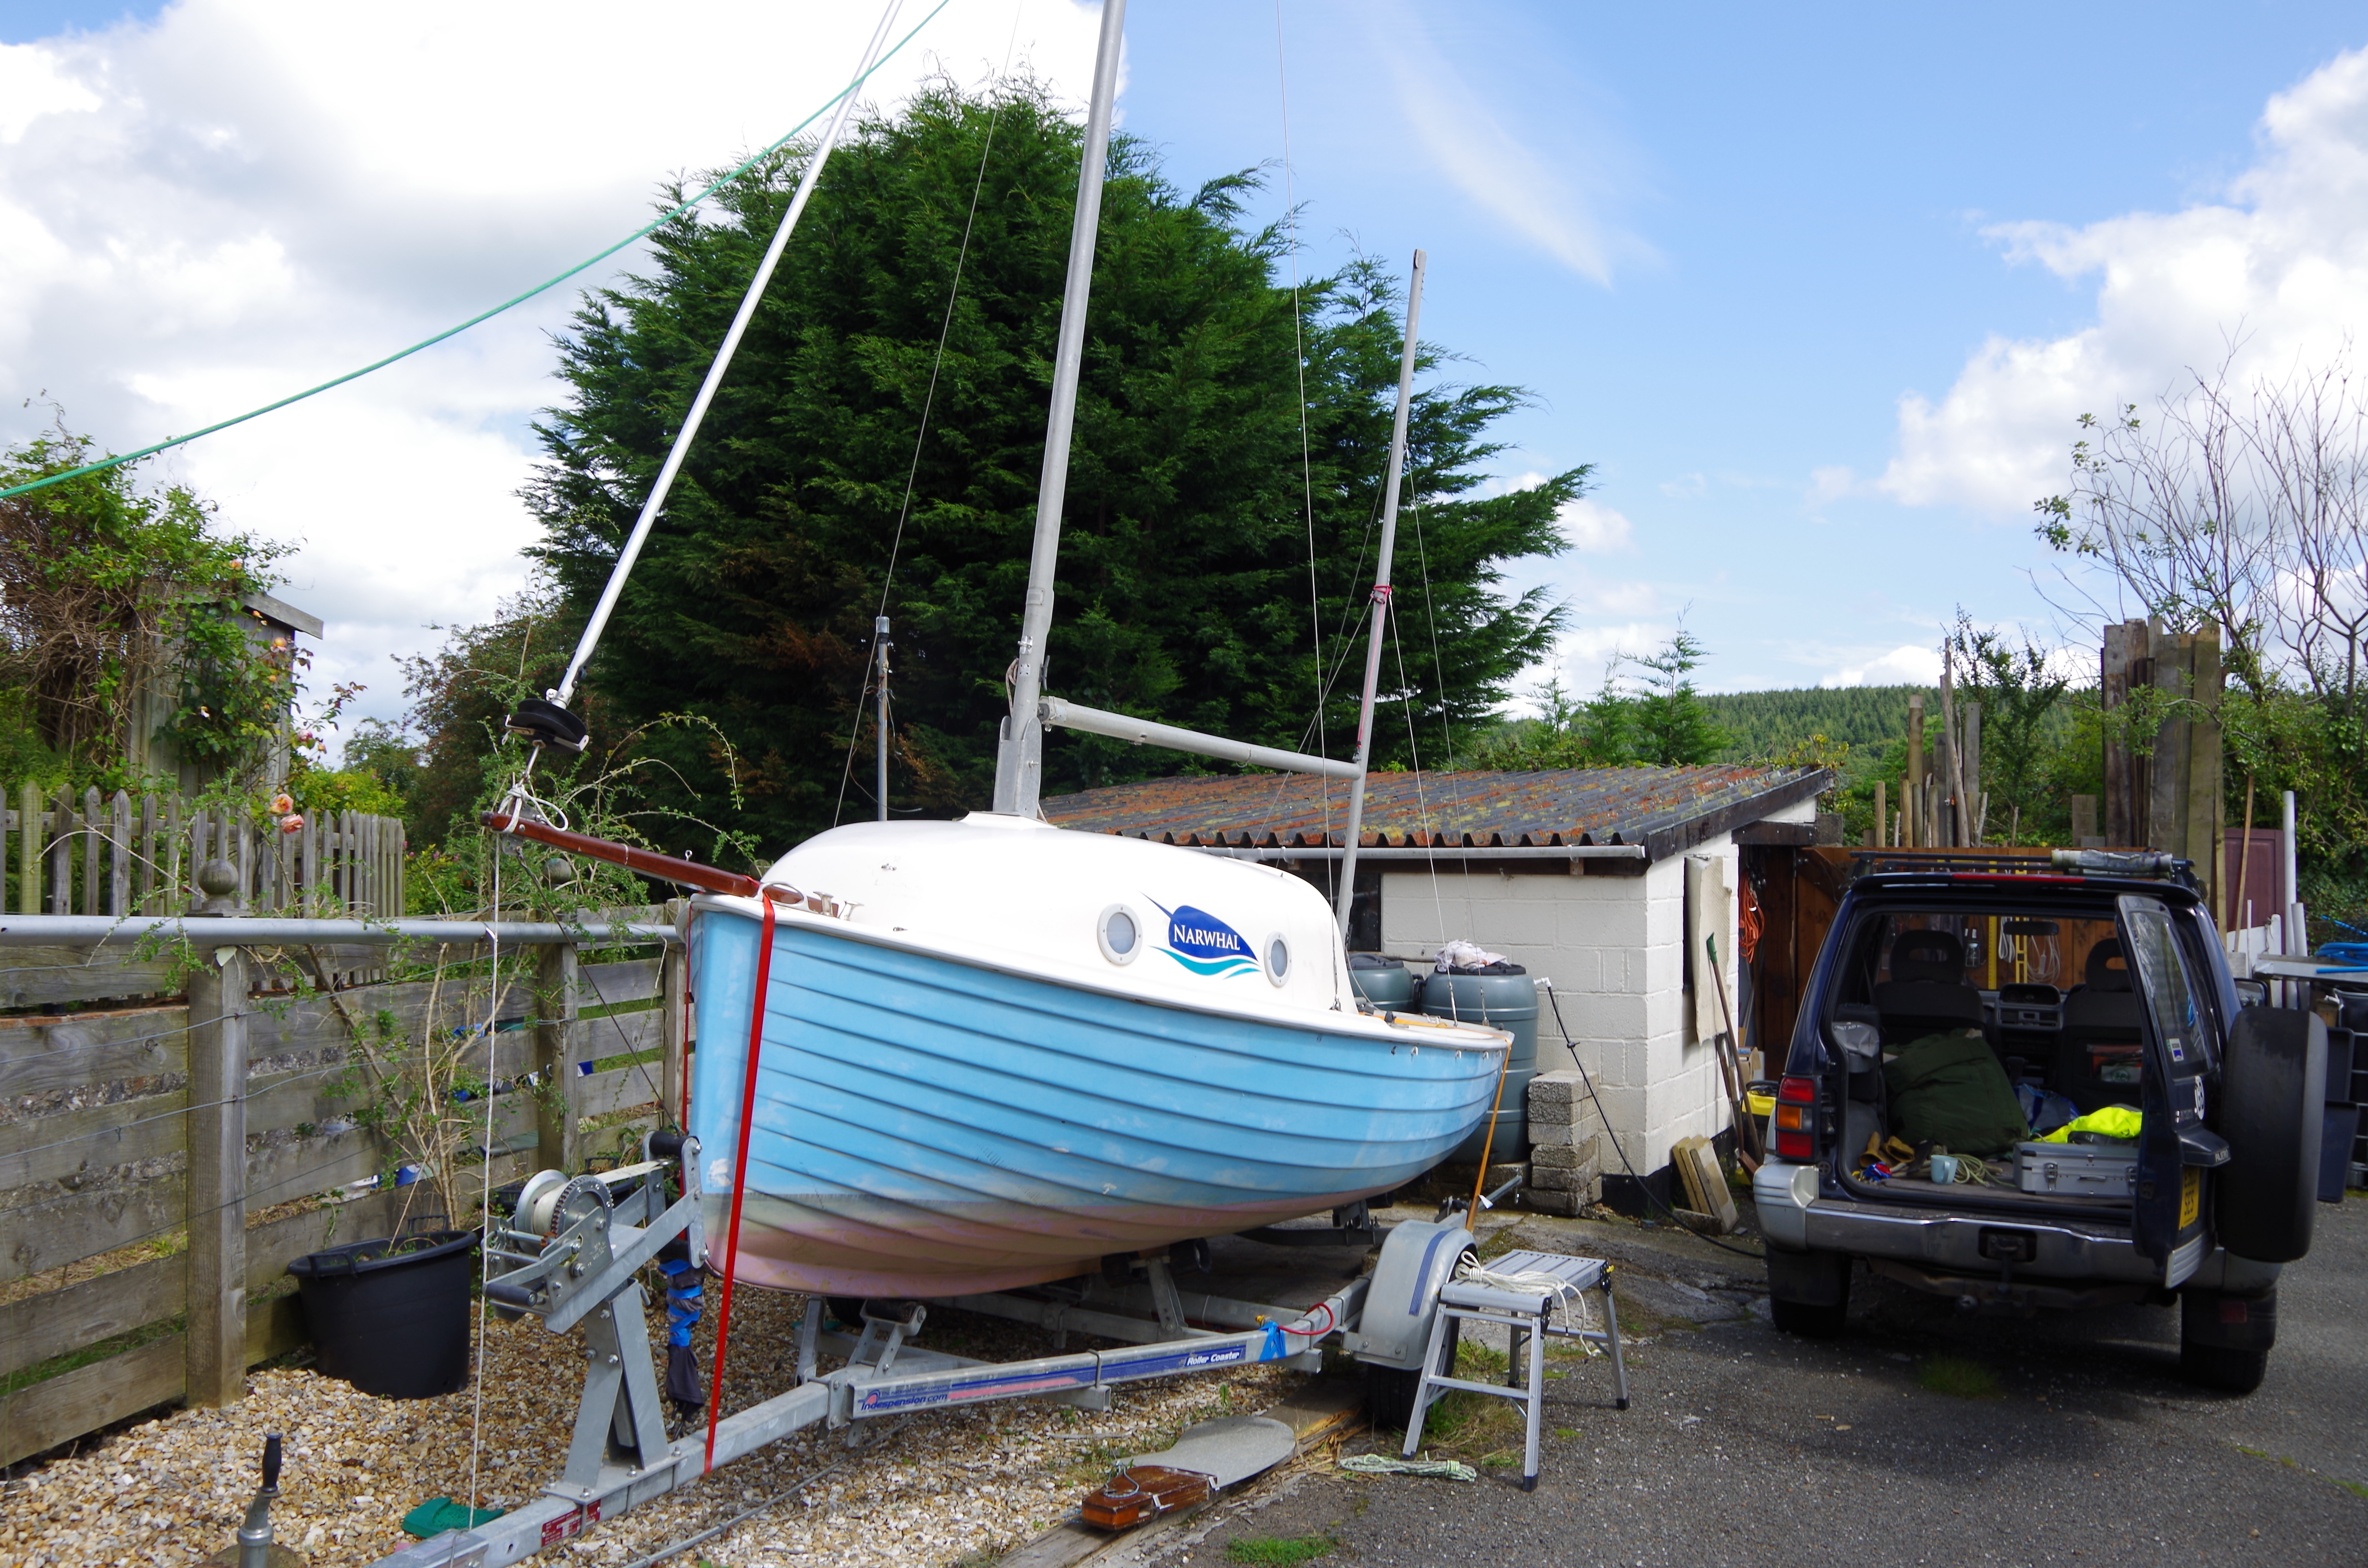
My fellow sufferers will be pleased to know that with my partner’s help (and with my neighbour watching) we managed to get it up .
I did pretty much what Ian described but with the addition of a gantline tied off to a ring halfway up the mast and because the mast had to start off in a position with its head on the garage roof the mast foot was already wedged into the tabernacle. We are going to drop the rigs again at the end of the day today but its good to see everything up : much better idea now of how everything does and doesn’t work well. At this stage and with this rig i mainly think that there are a whole load of details that could be improved.
What i have been saying about this boat and this project is that everything has to work and work well and that means across each domain of activity and detail : for example getting the boat in and out of the drive by myself when i have to, getting the rigs up and down quickly, of course maxi-ising the sailing performance and ergonomics and crucially making the sail plan flexible and in the Pardy parlance ‘unstoppable’ ie will sail across all feasible wind strengths. Something you may not have heard me talk about is the kind of work i often did with boats that i was involved with in racing and that is simply to make everything work quickly and properly in all conditions with the least amount of hassle and ultimately risk to the crew. Example : ok a good one is the many small detail changes i made on the big yellow boat so that it could be reefed by just 2 people and that’s a masthead maxi with a boom 5 feet or so above the deck, i don’t know how many square feet and 2 people might just be me and the 5′ 6″ cook…..and we did that many times with no stress whatsoever just with some simple changes.
Today i have been experimenting with just one detail ie getting the mainmast up and down quickly and in so doing working out as many of the details that don’t work at the moment. Right now what doesn’t work well is pretty well every aspect of that process from the tabernacle shape, the pivot point, the shroud attachment and adjustment and ditto the forestay attachment. So for each of those there is now a micro project to try and find a solution : if i can find a simple solution with the old mast and fittings i can then incorporate all the changes into the new rig. Just to answer one of Ted’s questions about the rig….yes it will be staying as a 2 stick but the proportions are likley to change towards a more modern approach and i have in mind now what i am working towards which is the last generation of Whitbread maxi ketches (NZE and La Poste) they took the racing ketch concept to its logical conclusion and no i can’t go that far with this boat but the principles will be similar.
Todays experiments then.
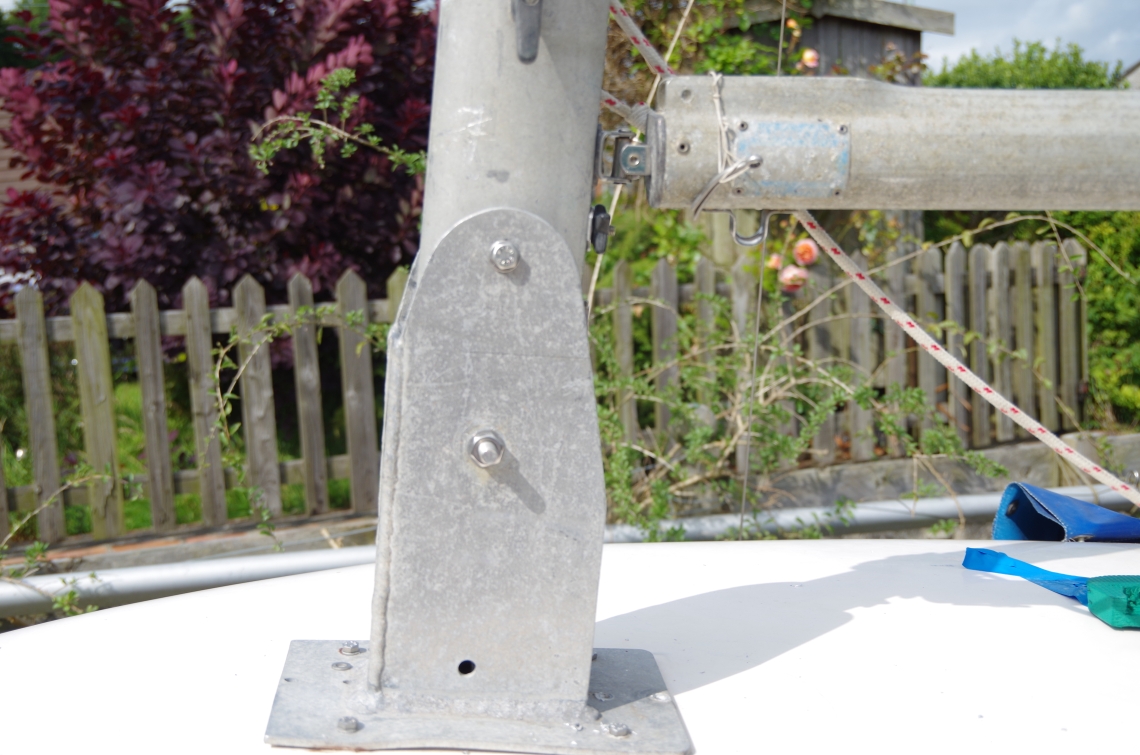
1.Tabernacle. So far i have drilled a new hole through each side of the cheek plates at a point where the mast can lay in the tabernacle with the pivot bolt already in. This might in practice also require that the mast be supported on a simple crutch aft before it is hoisted but that’s an easy thing to make. I know that there should be a compression tube/bush through the mast at the new pivot point and no i can’t alloy weld but what i am going to do is epoxy and glass wrap the mast foot over the existing damage and ‘fatten’ the whole mast foot perhaps with some stainless steel spacer/washers that i have kicking around. (new top bolt is the new pivot position). While i was playing around with the tabernacle i noticed that it isn’t even true but is definitely at a slight angle to one side and one side plate is twisted out slightly.
>New tabernacle.
End of day edit : Tabernacle taken off and turned around so tomorrow we might see if its easier to rig that way with the new higher pivot.
2. Shrouds. On this mast the shrouds are mounted conventionally at the hounds and attached at the deck by SS rigging screws. The metal hoop that they are attached to has already been modified (section reduced) as the bottle screw end is too narrow for them, also both bottle screws have been distorted at some time, most likely by binding up during the hoist which is exactly what happened today. I will almost certainly replace the wire shrouds anyway with ‘soft’ rigging that terminates with either a simple eye and dyneema lacing or with modern alloy deadeyes and possibly with new external chainplates on blocks outside the deckline.
> New soft shrouds with lacings/deadeyes, new chainplates
3.Forestay. Currently has the reefing tube/spar attached and is fastenned at the bowsprit end with a multi-point adjustment plate. Today i couldn’t get the right balance between attachment point , mast rake and shroud adjustment so i took the plate out and just laced the forestay down to the end of the bowsprit and that is how it will be done in the future. When i took the mast down again at the end of the day i also noted a whole mess of shackles plus a rigging screw at the top end as well so i need to strip that all down to a plain forestay. Note here : i will be building a new bowsprit anyway which will be wider and maybe deeper, it will be solidly attached to the boat but removeable. The new forestay when i fit it will be the primary tensioning point in the rig and will be laced down. There won’t be a reefing spar but rather the front end will be rigged as a ‘slutter’….in this case with a hanked on genoa and with smaller jibs on furlers that will be quickly attachable to the bowsprit and hoisted on their furlers….maybe a modern version of the old Wykeham Martin gear but with vectran luffs. There will almost certainly be an attachment point outside the forestay for an asymmetric kite and anchoring gear there too. Funny moment today when i was briefly cursing Ian because i thought that he had taken the halyards out without leaving mouse lines through the masts . That would have been a frustrating job to reeve new halyards but it looks as though they all run externally .
>New forestay
>New bowsprit
>Furlers.
4.Quick look at foils while i am here.
Old rudder here is the metal blade, the wooden blade is off my Osprey project , its about the right size and shape so just needs new cheeks and gudgeons.

>New rudder cheeks, new tiller.
5. Mast. The existing mast isn’t in great condition with some damage at the foot and quite a bit of foxing/oxidation generally. I might give it a tidy up and as said above do a temporary epoxy and glass wrap at the base to keep it going.
6.Mizzen. I rigged the mizzen so that i could see the whole rig in place and yes it really is tiny. I can see that the problem that the racing yawls have is that the stick just sits on the aft deck and most of the yawls have had considerable reinforcement built in under the deck to take any tightness in the rig. My solution is going to be to take the mizzen forward and down until its foot sits on the bottom of the boat , is held in partners at the coaming and has maybe just aft shrouds. Obviously this needs a new stick but i have the mast off the Osprey which looks like a very similar section so i can get a length out of that. The mizzen will also be taller and the boom might be swapped out for an angled sprit to give the sail some vang effect. That does affect the rudder and tiller so it will need a nice curved laminated tiller to work around the mizzzen (nice little project). The sheeting arrangement for that might be best with a little boomkin too.
>New mizzen and rigging.
>New mizzen boom/sprit.
>New tiller
7.Mast supporting arch. I will try and draw one of these and photograph the drawing. The section of the arch is about 45mm depth and 50mm width on top of some extra laminations of glass and maybe a glass overlay which is about 150mm wide and maybe 5mm thick. As i have said before there are 2 arches underneath the cuddy that form the original mast support. Ted i think said that the basis of this is an iron hoop. The tabernacle sits in between the 2 arches just bolted through the GRP cuddy and doesn’t span the area between/above the arches properly. I will almost certainly reinforce both arches as an early job as that will clear the cuddy space maximally. First thoughts on this are to get in there and make a couple of patterns and then do a 2 stage job : first ‘sister’ the existing arch section and then cap the new wider section with a combination wood/epoxy laminated arch. Alan i know will suggest carbon which i haven’t worked with successfully but that might work with what i am planning as the beam outer layers.
8.Alt-power. I will do a separate post about repowering the boat. There is currently a 4hp Mariner stroker that runs. Some owners alter the back of the boat to include an outboard well and that is a project i should look at . What i will fit will be rowlocks and a set of oars. I need to do a bit or research on finding the correct oarlock (or thole pin) position . What i will add in the French style is a sculling notch or rowlock out back as this should be a good boat to scull along.
Ketches.
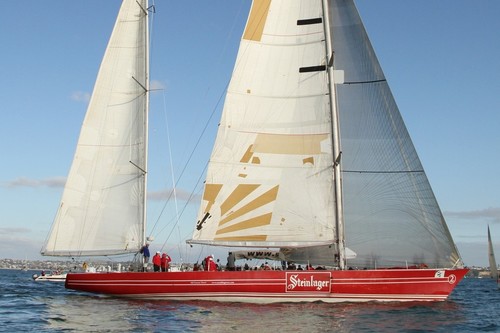
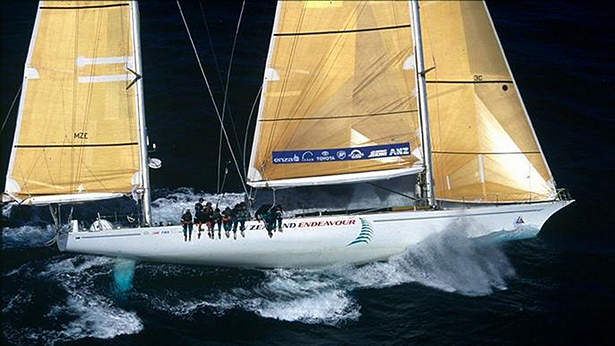
I thought i would finish this post with a couple of pictures that flashed into my mind when i think about split rigs. As some readers will know my era of racing boats ended with Whitbread Maxi’s and the first generations of Whitbread 60’s. This might seem a strange mention in a post about a small cruising dinghy but i genuinely like split rigs for some of the benefits they bring. This boat is certainly a ketch rather than a yawl and the hull is much more similar to an IOR boat than say a classic boat : i am thinking of something like Dorade or even a Swan 65 ketch. Take the lines from this boat and compare them with the late era IOR boats and you will see great similarities and yes it all changed radically with the later generation V 70’s. Go back to the last 2 generations of IOR maxi design though and you still have a canoe body with a deep simple fin and a spade rudder. What those last 2 generations of IOR ketch did was fully explore the potential of adding sail area and for the result is that they dominated the long distance race course albeit briefly as the whole IOR idea was by then a dinosaur. In the race that i sailed 2 boats completely dominated : Steinlager and Fisher & Paykel and of those it was the fractionally rigged Steinlager that was tops.
I could say a lot about this design but basically that she was a pretty ‘normal’ shaped maxi with the addition of a second mast and some jiggling around with mast and keel position compared with a maxi sloop. The last generation boats from the same office were quite different as a lot more was then known about making the big kecth rig work : a crucial element is the separation of the rigs and getting the main mast further forward. In the last 2 boats that was done by creating the unique clipper bow which is really just a faired-in bowsprit and by making the rigs very high aspect with relatively small headsails. This is the kind of thing that is now directly informing the direction i might go with this little boat ie keep the main mast well forward but alter the proportion to a shorter boomed and higher aspect rig, pull the mizzen a bit forward and go up on the height to make it a genuine power-house in the sailplan but keep decent separation between the rigs. Of course working out the new balance will be an interesting task but it would be relatively simple to add a slightly longer bowsprit and fine tune the foils position ( the better and deeper rudder will help too).
This might now all seem a bit odd in that i have gone from the hippy-dippy end of JW designs and soft gaff wingsails back to the hardcore end of Whitbread boats but here’s the thing : both are within my experience of sailing and i will take ideas from wherever i find them.
Comments :
Alan wrote : ” Good piece Steve glad you got it up in the end.
Also in answer to a question about laminating with carbon fibre : ”

Good piece Steve glad you got it up in the end.
You will have a busy winter and as with all good lists involving boats it will grow !
Your idea of laminated beams sistering the existing ones is good should make the whole thing stiffer and as you said put the tabernacle on something rather than chopped strand glass !
That tabernacle looks a bit average looks as though the weld distortion on the flange was not even sorted out !
Mizzen staysail was unmeasured I think…….. you could do a Fortuna wing for the mizzen but it would have to stay up better.
LikeLike
Yeah that was a failure i remember.
LikeLike
Forgot to ask how to do carbon over timber…i have found carbon very difficult to use so far.
LikeLike
Hello Steve. The trouble with addiction, or more so OCD, is avoiding constant interaction. I came in for a sandwich and discovered that you had managed to raise the main mast and set up the rig. Bravo. My quick read of the other stuff will maybe require some digesting, but of course your blog and your boat. One point re reefing applied particularly to the DY/DD and SY is that reducing sail is usually a case of dropping the main and sailing on jib/Genoa and mizzen. They balance and go well with this set up, and of course the cuddy adds to the protection. If still over powered then you should not be out there.
LikeLike
I seem to remember the bumpkin pulled out of the transom ……..
Because the carbon is so stiff it usually needs bagging or covering and squeegeeing on to the job to get a good result with no voids we did some long skate board decks with a wood core for a customer and used a mylar film over the laminate and squeegee out the resin to get that shiny look that he wanted and of course a god lay up that was not resin rich.
Use some colloidal silica in the resin to prevent draining
The frame needs to use Uni’s laid on the face (cap) of the frame probably finishing with a plain or satin weave over the top to keep it all together its depth of section that gives the stiffness.
Think I beam
A good laminated beam will improve things a heap as choppy is never that stiff.
Not sure how tight the curve is but a mould and thin veneers should get you sorted you might have to steam them and set in place to dry then laminate them up.
LikeLike
Hi Steve, afraid it is me again, as just popped in for a cuppa. I note that you have had much experience with big boats especially for racing, and also your Minstrel. All are virtually enclosed and would survive knockdowns, etc. The Dayboat, however, is an open boat, albeit with a cuddy, and is very heavy for its size to boot – reckon around the 450-500 kgs mark. Therefore careful consideration, as with the DY version, needs to be taken into account if a blow is forecast, The cuddy does offer some shelter and will keep out most spray kicked up by the simulated clinker hull, and of course reduced sail also helps, but a lumpy sea and the like are to be avoided. I guess more later as heavy rain due here and play outside is terminated for the day..
LikeLike
The rain has come so inside jobs take over. A small piece of info that may be of help is related to removing water from the boat. There should be a diaphragm pump that connects with the sump (lowest part of the internal hull) located just in front of the centreplate case, with pipe for the exit of the water either into the top of the cp case, or taken aft to exit through the transom. This for removing water that accumulates below the floorboards. Additionally, and part of the Class Rules, is the requirement for a bucket of 2 gallons/9 litres capacity to be onboard to enable “a man in a panic” to remove water quickly that has come aboard. There are a few that have fitted small electric pumps using fire alarm batteries, but the problem is to maintain and renew the charge. I guess that solar panels mounted on the cuddy top could be used.
LikeLike
Sorry, me again. Another small detail that may be worth considering is fitting a washboard either side on the side deck near the aft end of the cuddy. The raised edge of the deck ends about 6 to 9 inches from the end of the cuddy. If one fits a wooden (teak) wash board, say 3 inches high by the cuddy and tapered down to about an inch at its outer end, face cut at an angle to help deflect the water and the wash board angled on the deck about 30 to 40 degrees – fit by screwing into under the deck. This should deflect any water running down the side deck from coming into the cockpit. Hope that you get the picture. Certainly worth fitting if considering a tent cover. Finish using epoxy. Not yet looked through your earlier thoughts
LikeLike
Hi Steve, yep, the main halyard ran externally, the jib halyard down the luff spar, and the topping lift added by me using the external block on the port side of the mast.
LikeLike
Re Steinlager, etc. Just after the finish of that race a took a yacht into one of the Hamble Marinas where The Card was moored, having just been purchased by a Ted Turner syndicate as a trial horse for the next race. One of the crew invited my and my crew on board – fascinating to see the yacht blow decks.
Which yacht were you on?
LikeLike
One other comment regarding quick fitting to the end of the bowsprit. The far end isn’t easy to reach while afloat. Options include sitting astride the bow, feet close to the water ( or in the waves), but needing to be very flexible in the lower spine. Or kneeling awkwardly on the for deck committing upper body weight forward at point of least stability! Hopefully food for thought. I’m enjoying your blog and look forward to more.
LikeLike